

Overview
In this tutorial, we'll walk through the creation of a robust Continuous Delivery pipeline on AWS for a simple web application. Starting with setting up a GitHub repository for our code, we'll leverage AWS services like Elastic Beanstalk, CodeBuild, and CodePipeline to automate the deployment process. By the end, you'll have a comprehensive understanding of how to streamline software delivery on AWS, enabling faster and more reliable updates for your applications.
What You Will Accomplish:
This tutorial will guide you through:
GitHub Setup: Establish version control for your code.
Elastic Beanstalk Deployment: Deploy your application effortlessly.
CodeBuild Configuration: Automate builds from GitHub.
CodePipeline Setup: Create a continuous delivery pipeline.
Application Architecture:
The architecture of our continuous delivery pipeline revolves around seamlessly integrating various AWS services with GitHub. Below is a visual representation of the services involved and how they are interconnected:
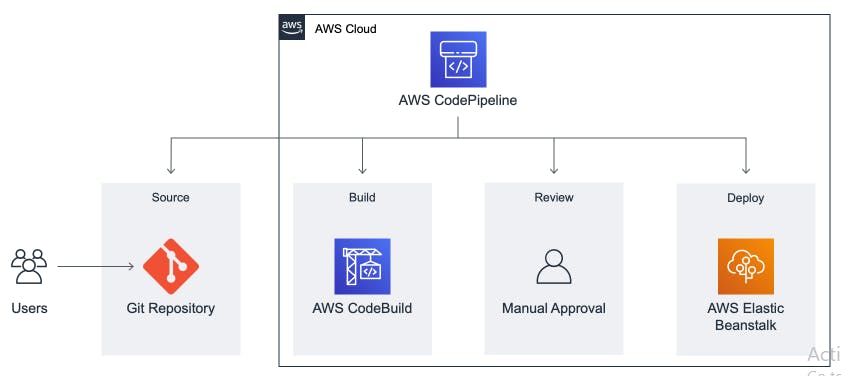
Services Used:
GitHub: This serves as our version control system, where our application code resides. GitHub provides a collaborative platform for managing code changes and facilitating team collaboration.
AWS Elastic Beanstalk: Acting as our deployment platform, Elastic Beanstalk simplifies the process of deploying and managing applications on AWS. It automatically handles the deployment, capacity provisioning, load balancing, and auto-scaling of the application.
AWS CodeBuild: CodeBuild is utilized to automate the building process of our application code. It pulls the source code from GitHub, executes build commands specified in the buildspec file, and produces deployable artifacts.
AWS CodePipeline: CodePipeline orchestrates the continuous delivery process, providing a fully managed CI/CD service. It automates the workflow for releasing changes to our application, from source code commits in GitHub to deployment on Elastic Beanstalk.
Step 1: Setting Up Your Code Repository
In this Step, you'll establish a repository for your application code, enabling easy access and collaboration over the Internet. While we'll be using GitHub in this example, there are other Git-compatible options available, such as AWS CodeCommit. Connecting this hosted repository to our pipeline in a later module will automate the build process whenever a new commit is pushed.
Navigate to GitHub:
Open a new browser tab and go to GitHub.
Ensure you are logged into your GitHub account.
Access the Repository:
- In the same tab, open the aws-elastic-beanstalk-express-js-sample repository.
Fork the Repository:
Click on the "Fork" button located on the top right corner of the screen.
A small window will appear asking where you would like to fork the repository. Verify that your account is selected.
Choose "Create a fork". After a few seconds, a copy of the repository will appear under your GitHub account's "Repositories" tab.
Push a Change to Your New Repository:
Access the Repository:
- Go to your forked repository on GitHub and click the green "Code" button near the top of the page.
Clone the Repository:
Confirm that the heading says "Clone with HTTPS". If not, select the "Use HTTPS" link.
Click the white button with a clipboard icon next to the URL to copy the repository's HTTPS URL.
Open Terminal or Git Bash:
- If you're on a Mac or Linux computer, open your terminal. If you're on Windows, launch Git Bash.
Clone the Repository:
In the terminal or Git Bash, enter the following command:
git clone https://github.com/YOUR-USERNAME/aws-elastic-beanstalk-express-js-sampleReplace "YOUR-USERNAME" with your GitHub username. Press Enter.
You should see a message in your terminal starting with "Cloning into...". This command creates a new folder containing a copy of the repository's files.
Make Changes:
Navigate to the newly created folder "aws-elastic-beanstalk-express-js-sample" and open the file "app.js" in your code editor.
Modify the message in line 5 to say something other than "Hello World!" and save the file.
Commit Changes:
In the terminal or Git Bash, navigate to the folder containing your cloned repository.
Enter the following commands:
  git add app.js
  git commit -m "Change message"
This stages and commits your changes with a descriptive message.
Push Changes to GitHub:
Push the local changes to the remote repository hosted on GitHub with the following command:
git pushNote: You may need to configure Personal Access Tokens under Developer Settings in GitHub for remote authentication.
Step 2: Deploy Web App
In this module, you'll leverage the AWS Elastic Beanstalk console to create and deploy a web application. AWS Elastic Beanstalk simplifies application deployment and management on AWS infrastructure, abstracting away the underlying infrastructure concerns.
Key Concepts:
AWS Elastic Beanstalk: A service that simplifies application deployment on AWS. It handles deployment, management, and scaling of applications by automatically provisioning resources.
Environment: A collection of AWS resources provisioned by Elastic Beanstalk to run your application. It includes components like EC2 instances, load balancers, and databases.
EC2 Instance: A virtual server in the cloud provided by Amazon Elastic Compute Cloud (EC2). Elastic Beanstalk provisions EC2 instances to run your application.
Web Server: Software that uses the HTTP protocol to serve content over the Internet. It stores, processes, and delivers web pages to users.
Platform: A combination of operating system, programming language runtime, web server, application server, and Elastic Beanstalk components. Your application runs on a platform provided by Elastic Beanstalk, leveraging its components for execution.
Configuring an AWS Elastic Beanstalk App:
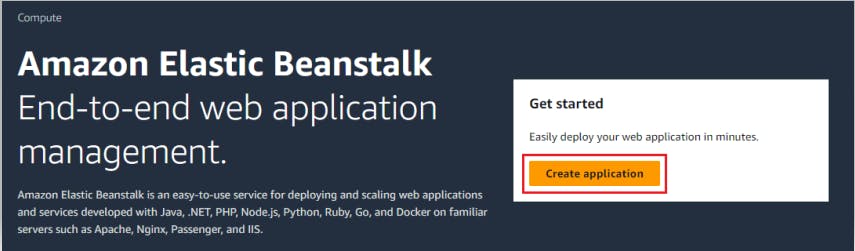
Open AWS Elastic Beanstalk Console:
- Open a new browser tab and navigate to the AWS Elastic Beanstalk console.
Create Application:
Click the orange "Create Application" button.
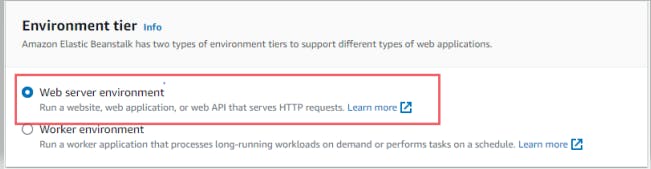
Configure Environment:
Under the "Configure environment" heading, select "Web server environment."
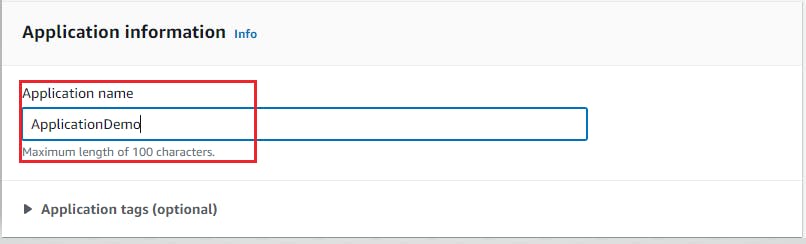
Provide Application Details:
In the text box labeled "Application name," enter "ApplicationDemo"
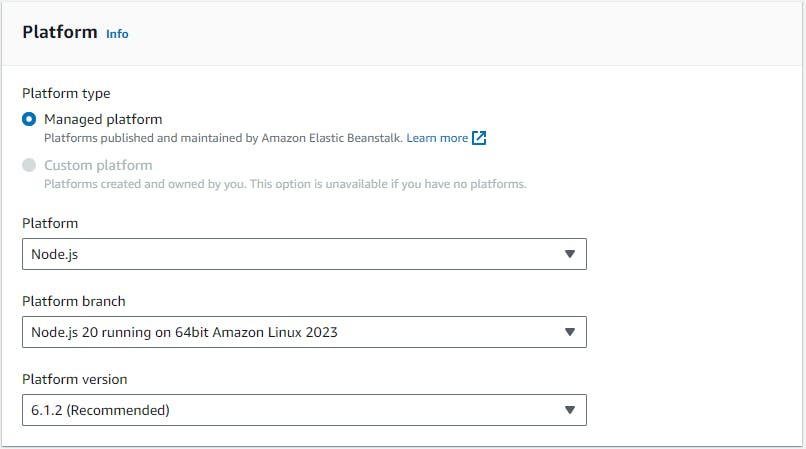
Select Platform:
In the "Platform" dropdown menu, under the "Platform" heading, choose "Node.js." The "Platform branch" and "Platform version" will automatically populate with default selections.
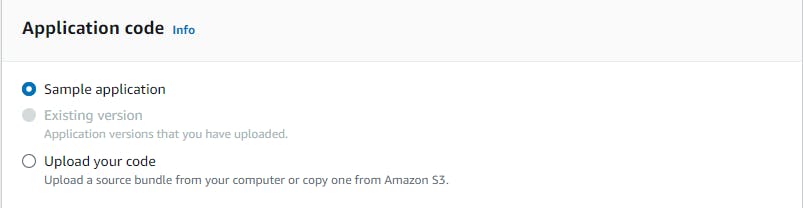
Choose Application Code:
Confirm that the radio button next to "Sample application" under the "Application code" heading is selected.
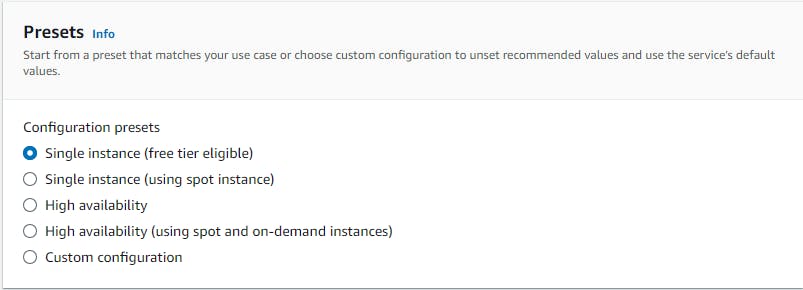
Select Environment Type:
Confirm that the radio button next to "Single instance (free tier eligible)" under the "Presets" heading is selected.
Proceed:
- Click "Next" to proceed to the next step.
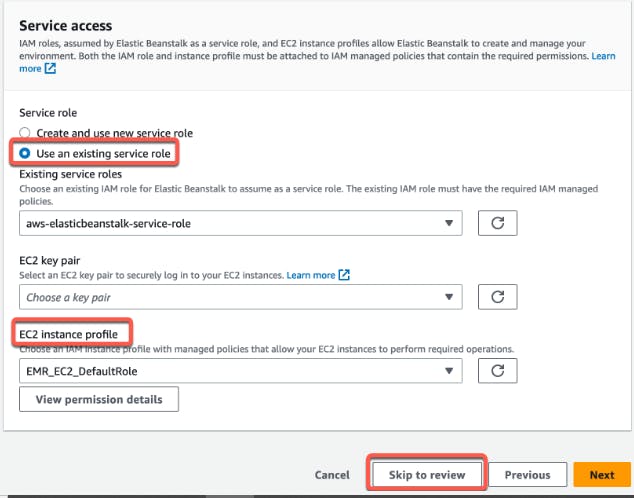
Configure Service Access:
On the "Configure service access" screen, choose "Use an existing service role" for "Service Role."
Select EC2 Instance Profile:
The values displayed in the "EC2 instance profile" dropdown list may vary depending on your account's configurations.
Choose one of the following options based on the values displayed:
If "aws-elasticbeanstalk-ec2-role" is listed, select it from the dropdown list.
If another value is displayed and it's the default EC2 instance profile intended for your environments, select it.
If the dropdown list is empty, follow the procedure to create an IAM Role for the EC2 instance profile.
10 . Create IAM Role (if necessary):
If there are no values in the EC2 instance profile dropdown list, follow these steps to create an IAM Role:
Complete the steps in "Create IAM Role for EC2 instance profile" to create the necessary IAM Role.
Once the IAM Role is created, return to this step.
After refreshing the list, the IAM Role you created will be displayed as a choice in the dropdown list.
Select the IAM Role you just created from the EC2 instance profile dropdown list.
11. Skip to Review:
Choose "Skip to Review" on the "Configure service access" page to proceed.
This will select default values for this step and skip optional steps.
12. The Review page displays a summary of all your choices.
13. Choose Submit at the bottom of the page to initialize the creation of your new environment.
Step 3: Create Build Project
Overview:
In this module, you'll utilize AWS CodeBuild to build the source code stored in your GitHub repository. CodeBuild is a fully managed continuous integration service that compiles source code, runs tests, and prepares software packages for deployment.
Key Concepts:
Build Process: Converts source code files into an executable software artifact, often involving compiling, testing, and packaging.
Continuous Integration: Regularly pushing changes to a hosted repository, triggering automated builds and tests.
Build Environment: Combination of operating system, programming language runtime, and tools used by CodeBuild for building.
Buildspec: YAML-format collection of build commands and settings used by CodeBuild to execute a build.
Build Project: Configuration detailing how to run a build, including source code location, build environment, commands, and output storage.
OAuth: Open protocol for secure authorization, enabling connection of GitHub accounts to third-party applications like AWS CodeBuild.
Configure AWS CodeBuild Project:
Access AWS CodeBuild Console:
- Open a new browser tab and go to the AWS CodeBuild console.
Create Project:
- Click the orange "Create project" button.
Project Settings:
- Enter "Build-Application" in the "Project name" field.
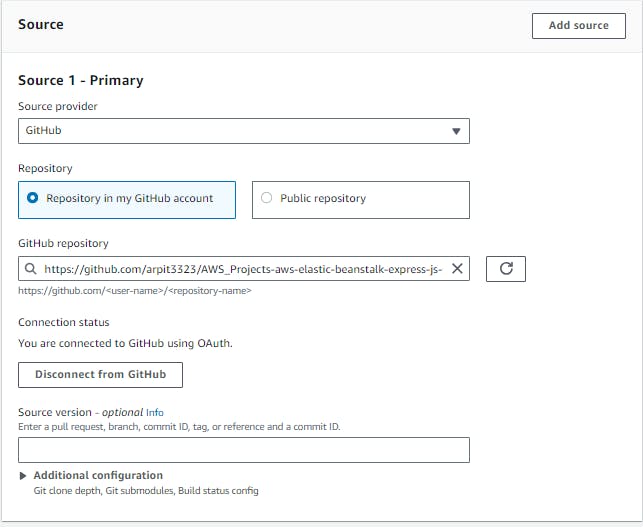
Source Provider:
Select "GitHub" from the "Source provider" dropdown menu.
Ensure the "Connect using OAuth" radio button is selected.
Authorize GitHub Access:
Click the white "Connect to GitHub" button.
Authorize AWS CodeBuild access to your GitHub repository by clicking the green "Authorize aws-codesuite" button.
Enter your GitHub password and click "Confirm".
Select Repository:
Choose "Repository in my GitHub account".
Enter "aws-elastic-beanstalk-express-js-sample" in the search field.
Select your forked repository.
Configure Build Environment:
Confirm "Managed Image" is selected.
Choose "Amazon Linux 2" from the "Operating system" dropdown menu.
Select "Standard" from the "Runtime(s)" dropdown menu.
Choose "aws/codebuild/amazonlinux2-x86_64-standard:3.0" from the "Image" dropdown menu.
Ensure "Always use the latest image for this runtime version" is selected for "Image version".
Confirm "Linux" is selected for "Environment type".
Ensure "New service role" is selected.
Create Buildspec File:
Insert Build Commands:
- Select "Insert build commands."
Switch to Editor:
- Choose "Switch to editor."
Replace Buildspec:
- Replace the existing Buildspec in the editor with the provided code:
    codeversion: 0.2
    phases:
      build:
        commands:
          - npm i --save
    artifacts:
      files:
        - '**/*'
Create Build Project:
Click the orange "Create build project" button.
You should now see a dashboard for your project.
Test the CodeBuild Project:
Start Build:
- Click the orange "Start build" button. This will load a page to configure the build process.
Confirm GitHub Repo:
- Verify that the loaded page references the correct GitHub repo.
Start Build Again:
- Click the orange "Start build" button.
Wait for Completion:
- Wait for the build to complete. You'll see a green bar at the top of the page with the message "Build started", the progress for your build under "Build log", and after a couple of minutes, a green checkmark and a "Succeeded" message confirming the build worked.
Step 4: Create Delivery Pipeline
Overview:
In this module, you'll utilize AWS CodePipeline to establish a continuous delivery pipeline encompassing source, build, and deploy stages. This pipeline will automatically detect changes in your GitHub repository, trigger builds using AWS CodeBuild, and deploy your application to AWS Elastic Beanstalk.
Key Concepts:
Continuous Delivery: Streamlined software release practice achieved by automating build, test, and deploy processes, enabling quicker software releases.
Pipeline: Workflow model defining the path software changes follow through the release process, comprised of stages.
Stage: Logical segment of a pipeline where actions are executed, such as build or deployment stages.
Action: Set of tasks performed within a pipeline stage, like triggering a pipeline upon code changes or deploying code to a compute service like AWS Elastic Beanstalk.
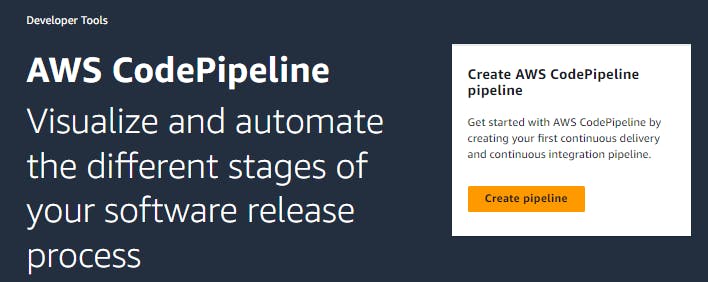
Create a New Pipeline:
Access AWS CodePipeline Console:
- Open a browser window and navigate to the AWS CodePipeline console.
Create Pipeline:
Click the orange "Create pipeline" button. A new screen will open to set up the pipeline.
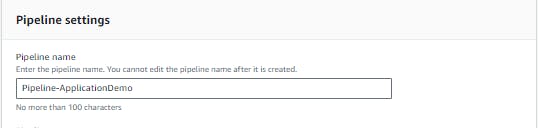
Set Pipeline Name:
Enter "Pipeline-ApplicationDemo" in the "Pipeline name" field.
Select Service Role:
Confirm that "New service role" is selected.

Proceed:
- Click the orange "Next" button.
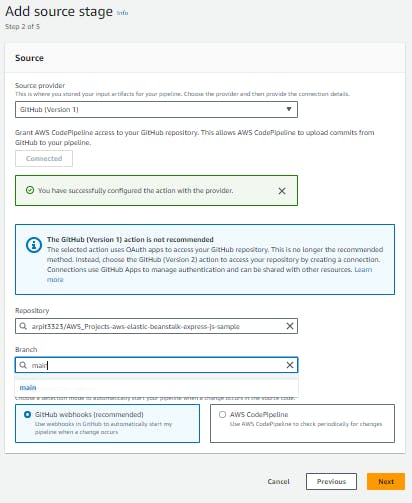
Configure Source Stage:
Select Source Provider:
- Choose "GitHub version 1" from the "Source provider" dropdown menu.
Connect to GitHub:
Click the white "Connect to GitHub" button.
Authorize AWS CodePipeline access to your GitHub repo by clicking the green "Authorize aws-codesuite" button.
Once authorized, a green box will appear confirming successful configuration.
Select Repository and Branch:
From the "Repository" dropdown, select the repo created in Module 1.
Choose "main" from the branch dropdown menu.
Confirm "GitHub webhooks" is selected.
Proceed:
- Click the orange "Next" button.
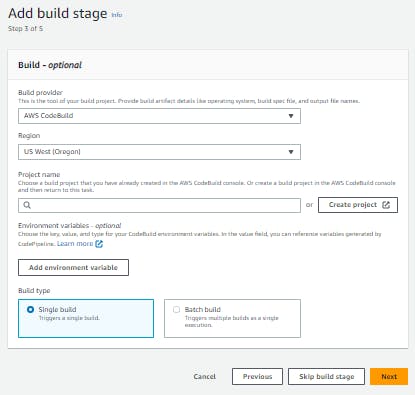
Configure Build Stage:
Select Build Provider:
- Choose "AWS CodeBuild" from the "Build provider" dropdown menu.
Confirm Region:
- Under "Region," ensure that "US West (Oregon)" is selected.
Choose Build Project:
- Select "Build-DevOpsGettingStarted" under "Project name."
Proceed:
- Click the orange "Next" button.
Configure Deploy Stage:
Select Deploy Provider:
- Choose "AWS Elastic Beanstalk" from the "Deploy provider" dropdown menu.
Confirm Region:
- Under "Region," ensure that "US West (Oregon)" is selected.
Choose Application and Environment:
Confirm the application "ApplicationDemp" created in Module 2 is displayed under "Application name."
Select "Application-env" from the "Environment name" textbox.
Proceed:
- Click the orange "Next" button to review the pipeline configuration.
Create Pipeline:
- After reviewing the configuration, click the orange "Create pipeline" button
Watch the First Pipeline Execution:
Monitor Pipeline Execution:
While the pipeline is running, observe the page displaying the pipeline steps.
Each step will change from blue to green as it succeeds.
Check Deploy Stage:
Once the Deploy stage turns green and shows "Succeeded," click on "AWS Elastic Beanstalk."
A new tab listing your AWS Elastic Beanstalk environments will open.
Access Deployed Application:
In the list of environments, select the URL in the "Devopsgettingstarted-env" row.
You should see a webpage displaying the content you included in your GitHub commit in Module
Step 5: Finalize Pipeline and Test
Overview:
In this module, you'll enhance your continuous delivery pipeline in AWS CodePipeline by adding a review stage. This stage enables manual approval before deployment, allowing someone to review changes before they are deployed. Manual approvals are valuable for ensuring quality and security by involving human validation in the deployment process.
Key Concepts:
Approval Action: Pauses pipeline execution until manually approved or rejected, ensuring human validation before deployment.
Pipeline Execution: Series of changes released by a pipeline, progressing through stages sequentially. Each stage processes one execution at a time, with stages locked during processing.
Failed Execution: Occurs when an execution encounters an error, halting pipeline traversal and changing status to "Failed." The processing stage is unlocked, allowing retrial or replacement.
Create Review Stage in Pipeline:
Access CodePipeline Console:
- Open the AWS CodePipeline console.
Select Pipeline:
- Choose the pipeline created in Module 4, named "Pipeline-ApplicationDemo."
Edit Pipeline:
- Click the white "Edit" button at the top of the page.
Add Review Stage:
Click the white "Add stage" button between the Build and Deploy stages.
Enter "Review" in the "Stage name" field.
Click the orange "Add stage" button.
Add Action Group:
In the Review stage, click the white "Add action group" button.
Enter "Manual_Review" in the "Action name" field.
Select "Manual approval" from the "Action provider" dropdown.
Leave optional fields blank.
Click the orange "Done" button.
Save Changes:
Click the orange "Save" button at the top of the page.
Confirm changes by clicking the orange "Save" button again.
Your pipeline now includes four stages: Source, Build, Review, and Deploy.
Push a New Commit to Repo:
Modify File:
Open "app.js" file from Module 1 in your code editor.
Change the message in Line 5.
Save the file.
Commit Changes:
Open your preferred Git client.
Navigate to the folder created in Module 1.
Execute the following commands:
  git add app.js
  git commit -m "Full pipeline test"
Push Changes:
Push the local changes to the remote repo hosted on GitHub with:
git push
Monitor Pipeline and Manually Approve the Change:
Access CodePipeline Console:
- Navigate to the AWS CodePipeline console.
Select Pipeline:
Choose the pipeline named "Pipeline-ApplicationDemo."
Wait for the Source and Build stages to switch from blue to green.
Review Stage:
Once the Review stage switches to blue, click the white "Review" button.
Write an approval comment in the "Comments" textbox.
Click the orange "Approve" button.
Monitor Deployment:
- Wait for the Review and Deploy stages to switch to green.
Access Deployed Application:
Click the AWS Elastic Beanstalk link in the Deploy stage.
A new tab listing your Elastic Beanstalk environments will open.
Select the URL in the "Application-env" row.
You should see a webpage with the updated content from your most recent GitHub commit.
Congratulations:
- Your fully functional continuous delivery pipeline hosted on AWS is now operational!